ANALOG
OUTPUT
INSTALLING THE ANALOG OUTPUT BOARD
Install
the analog output board as follows (refer to Figure 9-1):
Caution: Caution: the meter has no power-on switch, so it will
be in operation as soon as you apply power.
Important: Disconnect the power from the unit before installing this
option board.
1. Hold the analog output card in a horizontal position, with the
R37 and R38 potentiometers facing the back of the meter.
2. Line up the P6 connector on the interconnect board with the
J6 pin on the main board. Push down to secure.
3. Line up the J8 pin on the analog output board with the P8 connector
on the interconnect board. Push down to secure.
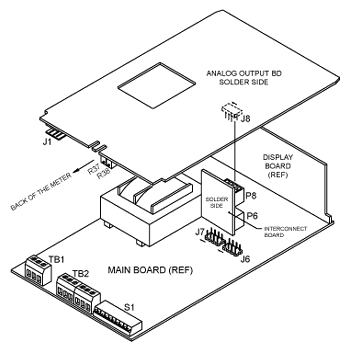
Figure 9-1. Installing the Analog Output Board
SETTING
UP THE ANALOG OUTPUT BOARD
* The display reading is in counts, disregarding the decimal point.
* The output is in volt or milliamp.
* The analog output may be used for proportional control applications,
without integral or reset function.
* "An LO" and "An HI" values are write-only. Values cannot
be displayed once they are stored. Display will show "000000." even through
values are stored.
NOTE: Refer to Table 6-1 for summary list of menu configuration.
Coarse adjust the analog output board as follows:
1. Set the left digit in configuration to 0 for 4-20 mA (0XXXXX)
or to 1 for 0-10 V (1XXXXX).
2. Access "An LO" menu item. Enter display value which will give
you 4 milliamps (0 volts).
3. Access "An HI" menu item. Enter display value which will give
you 20 milliamps (10 volts).
4. Save in either volatile or nonvolatile memory.
Once you have performed coarse adjustment, proceed to fine adjustment
as follows:
5. Adjust the input to show a value equal to "An LO". Adjust R38
potentiometer at the back of the board (refer to Figure 9-1) for 4 milliamp
output (0 volts).
6. Adjust the input to show a value equal to "An HI". Adjust R37
potentiometer at the back of the board for 20 milliamp output (10 volts).
7. Repeat fine adjustment as necessary.
An easy way to set the display to "An LO" and "An HI" is to put the meter
in the totalize mode and set the offset to "An LO" and "An HI" while there
is no input.
Example
1
0.00 - 1000.00 display counts to equal 4-20 mA analog output.
1. Set configuration = 0XXXXX
2. Enter "An LO" = 0000.00
3. Enter "An HI" = 1000.00
4. Adjust R38 potentiometer for 4 mA output, while display = 0.00
5. Adjust R37 potentiometer for 20 mA output, while display = 1000.00.
Example 2
5000 - 10000. display counts to equal 0 - 10 V analog output.
1. Set configuration = 1XXXXX
2. Enter "An LO" = 005000.
3. Enter "An HI" = 010000.
4. Adjust R38 potentiometer for 0 V output, while display = 5000.
5. Adjust R37 potentiometer for 10 V output, while display = 10000.
Example 3
Using analog output as a proportional controller: 8000. - 7000. display
counts to equal 4-20 mA analog output. When "An LO" is greater than "An
HI", the analog output may be used for proportional control applications.
1. Set configuration = 0XXXXX
2. Enter "An LO" = 008000.
3. Enter "An HI" = 007000.
4. Adjust R38 potentiometer for 0 V output, while display = 8000.
5. Adjust R37 potentiometer for 10 V output, while display = 7000.
Example 4
Programming "An LO" and "An HI" for analog output ranges other than 0-10
V or 4-20 mA. For example, if require 0-5 V output for the display readings
of 0 - 10,000:
1. Select 0 - 10 V range and enter "An LO" = 0
2. Enter "An HI" = 20,000.
Example 5
To get 1-5 V output for 0 - 10,000 readings, enter the desired display
for 0 V output as "An LO" per the formula below:
|
Gain
= Reading High - Reading Low
Input High - Input Low
|
Gain=
10,000 - 0 = 10,000 cts/V = 2,500 cts/V
|
|
Output
= Reading/Gain + Offset
|
|
Output
= Reading + 1
2500
|
Reading = -2,500
will cause 0 V output
Reading = 22,500 will cause 10 V output
An LO = 0
An HI = 22,500
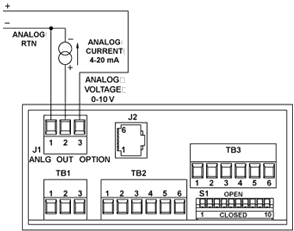
ELECTRICAL
CONNECTION and SPECIFICATIONS
The analog output board is available on the J1 connector.

J1-1: Analog Return
J1-2: Current Output
J1-3: Voltage Output |
|
|
Figure
9-2. Electrical Wiring for Analog Output Connection
|
Maximum Load Impedance
for Current Output:
500 ohm
Maximum Load for Voltage Output: 20 mA
Total Current Output (pins 2 and 3 combined): 21 mA
Response Time
Total Mode: 80 mSec (99% of final value)
Rate Mode: 360 mSec (99% of final value)
NOTE: Response time in the Rate Mode can be reduced by changing
the Gate Time, using RS-232 communication.
Minimum SPAN for 20 mA (10 V) output:
220 Counts
|
Maximum
turn down ration
|
|
80
|
Resolution:
15 bits
Accuracy, 0 - 10 V: 99.8%
Accuracy, 4 - 20 mA: 99.75%
|